Showing posts with label recipes. Show all posts

Saturday, 12 August 2017

Mum's Minestrone and a Crockpot Win


I have always been a reluctant crock-potter.  Partly because of the fare my mother produced in hers, when I was a child.  My mother and I have very different styles of cooking and preferences in food.  By far my tastes are more complex!  I am also more willing to put in more effort.  Don't get my wrong.  Mum is an excellent cook.  She just doesn't enjoy it, and isn't motivated to do more than necessary.  Also behind my crockpot reluctance is having produced some less than wonderful results.

My crockpot is as old as the hills, as you can see from the image below, which I found on Gumtree.  It was advertised as "retro".  Well, I'm not that old, but I have been married 26 years and this thing was a wedding gift.  It's not had that much of a workout and still works exactly as it did when we got it.  Mum insists the old crockpots were the best and not to get rid of it.  I've been a little more dubious.


Despite all of my reluctance and not-so-great experiences, which have included dry, stringy meat, I decided to give that thing another whirl.  I have Wednesday's off, so I figured that would be a good day to experiment, since I'm home to watch over it.  So, into that pot went my Mum's minestrone, minus the ham hock and beans.  I ended up having it on high all day, and it simmered very gently the whole time.  I turned it on low for a little bit, but everything just stopped moving and sank to the bottom.  I'm wondering whether 'low' is really just for keeping things warm, more than cooking things.  The last time I left something on low for 10 hours the carrots were still a little crunchy and the meat wasn't that tender.

An hour before I served dinner I threw in a few handfuls of risoni pasta and by the time we were ready to eat it was perfect.

That soup was the best thing I've cooked in the crockpot for years.  This coming week I'm going to try a rosemary balsamic chicken recipe and see how we go.  It was beautiful in the oven, so it had better live up to our high expectations!

Mum's Minestrone

Finely chop and saute an onion and 2 cloves of garlic, and then place in the crockpot, which is set on high.

Chop up into a fine dice:
3 carrots
1 zucchini
3 celery stalks
Throw into crockpot

Also add a tin of chopped tomatoes, Italian herbs and 1.5 litres water.

Set the crockpot to high and let it simmer for the day.  An hour before cooking add 3 handfuls of risoni pasta and cook for another hour.  You'll need to stir every now and then to make sure the pasta doesn't catch on the bottom.  You'll want to add salt (or not) to taste, depending on how you cook.

Serve with warm crusty rolls.
SaveSave

Wednesday, 5 July 2017

What's Cooking Wednesday....a healthy lunch


I'm not much for lentils, or salads (especially in winter!).  What I know, however, is that it's good to have more plant based foods in one's diet, and legumes are meant to be really good for you, for many reasons.  So, last week I was pondering my favourite pasta salad and thinking about how to have that salad yumminess (now there's an oxymoron!) without the pasta.

Necessity is the mother of invention, they say, so I set about to include some necessary healthful foods into my weekday lunches in a palatable manner.

I love Bobby Flay's Greek Orzo Salad, and use his recipe all the time, without the prawns.  I think what I love most is the dill!  So with this as the basis, I switched out the pasta and use French Puy lentils and pearl couscous instead.  I cooked 1/4 cup of each and mixed them together.  Then I quartered some cherry Roma tomatoes and a small Lebanese cucumber and added that, imprecise measuring and all, until it looked like a good ratio to the lentils and couscous.  I added just one spring onion and a handful of chopped dill, and omitted the feta.

The recipe made enough for 3 lunches.  This salad made the Thursday grade.  Thursday is tuck shop day at our school, and sad lunches just do not stack up in a staffroom of sushi and filled fresh baguettes.  Amongst those delicious tuck shop offerings, my salad still felt like a great lunch.  The texture that I don't love, with the lentils, was softened with the pearl couscous.  I'll keep using that combo and over time may I'll back off the couscous bit by bit until I am content with just the lentils.

Now I need to make this again, so that the leftovers from Miss Sunshine's party don't call my name too loudly!


Wednesday, 12 April 2017

Stop What You're Doing and Make This For Dinner

Image credit

Last night I had my kids rolling their eyes at me.  Probably because I said "Oh, this is soooo good," about 300 times too many.  You know how young adults get.

But this recipe was absolutely that good.

I tripped over it, only because I was reading Jen Hatmaker's Facebook page (no, I am still a staunched  hold-out, but I can read the public stuff, right?), and she's on a Whole30 journey.  Me?  I'm just looking for food that tastes good and provides us some positive nutrition.  Quick, simple, non-processed, delicious.  Lofty ideals in a fast-paced, Masterchef kind of world with all its extremes of take out to fuss and bother.

This recipe fits my profile for good, yummy food.  I give you Rosemary Balsamic Sheet Pan Chicken with Bacon and Apples.  OK, so the name is longer than the drive from Melbourne to Sydney, but if you can overlook that you've got a winner.

Of course there is always the requisite little tweaks a person makes for one reason or another.  The recipe calls for chicken breast.  I had drumsticks, so that's what I used.  The recipe calls for apples.  You will want more apples than that.  Just trust me.  Double the apples.  I used 3, because 2 looked like a piddly little amount in the pan.  I wish I'd done more.  And you can use apples that are starting to feel like you wouldn't want to eat them.  Winner!  Also, I grew up in the 70s when people boiled their cabbages to death.  I don't love Brussels sprouts.  When I say I don't love, I mean I have not touched one since I left home.  Plus Aldi doesn't sell them right now.  Bummer, right?  Instead, I served this with our favourite cabbage dish, alongside which is just shredded cabbage sautéed with spring onion and bacon.  Talk about perfect!

Now obviously, this meal fits a set of nutritional criteria that doesn't include starch.  So if you don't need to worry about that you could add potato cubes to your pan as well.  Miss Mischief seemed to think that would make it perfect.  I was pretty happy without.

Enjoy

Thursday, 19 January 2017

Rhubarb Relish - On Every Lunch


When we were up at Mum and Dad's last week, our everyday lunch was fresh bread rolls, cold meat and salad.  On the first day Mum insisted I try some new relish she's made, unfortunately she only pressed me once I'd had my roll and I was reluctant, because I am not a huge relish/chutney fan.  I'll eat them, but won't be all out for them.

Rhubarb relish?  Total game changer!  This is my new favourite lunch, pictured above.  And by favourite I mean totally obsessed.  Wholemeal Prista crackers from Aldi, butter, rhubarb relish and Colby cheese (I use a veggie peeler because I like my cheese thinly sliced).  And I am disappointed when this can't be my lunch.  This relish stopped me in my tracks and I insisted on the recipe, because you know, I have a rhubarb plant that is thriving.

I am totally in love with this relish.  Want to know what I'm on about?  Have a go for yourself.  Mum says it's super simple (I'm still enjoying the jar she generously gave me), and since my Mum isn't not prone to long, finickity recipes, you can believe this is super easy and unfiddly.

~ Rhubarb Relish ~

1kg rhubarb, chopped (about 1cm in length)
4 onions, finely chopped
4 cups sugar
10 teaspoons curry powder
1 cup white vinegar

  1. Combine ingredients in a pot and cook for 30 minutes.
  2. Blend if you think the rhubarb is too stringy (I would use a stab blender)
  3. Decant into sterilised jars and store in the fridge.
Ta da.  You will need ten thousand rhubarb plants to keep up with the addiction this stuff will birth in you.

You're welcome.

Tuesday, 26 April 2016

Grasping at Health...A Delicious Quinoa Salad


I've learned something about myself over the past two years.  I am not a raging carnivore.  Don't get me wrong, I would miss it if I never got to eat meat, but I'm really happy not to eat it too.  The trouble with that is that the alternative - legumes - are not my friends.  I don't mind eating them, but then I don't want to be near me.  Which is pretty much inescapable!

We have had a bit of back-and-forward tussle in our house over things like couscous and quinoa.  I enjoy them; my family does not.  Until last night.  Inspired by a recipe from "Jamie's 15 Minute Meals" and a lunch I was served on a PD (Independent Schools Victoria completely spoil their seminar attendees!) I decided to try a quinoa salad.  My goal?  An ecstatic moan-inducing salad.  No pressure, right?

This salad?  Life-changing!

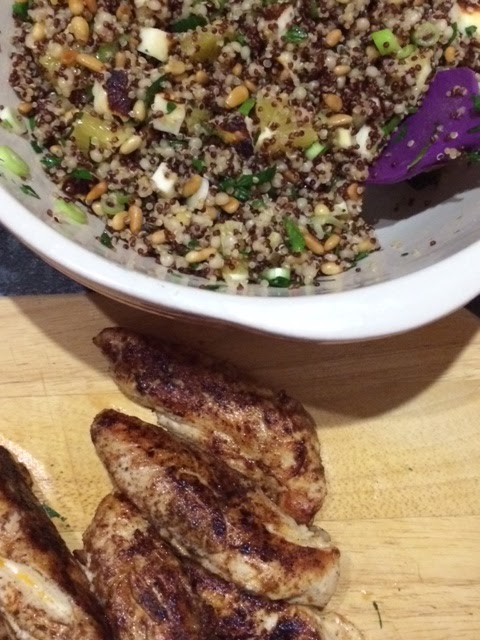
I cooked a cup of raw quinoa and half a cup pearl couscous using the absorption method in chicken stock, and then mixed that with:

  • toasted pinenuts
  • diced oranges
  • finely sliced spring onions
  • fried and diced haloumi (the haloumi I got from Costco - amazing!)
  • finely chopped parsley

After mixing it together I dressed it with the juice of a lemon and a good drizzle of olive oil.
I would have added avocado but mine weren't ripe yet, and if you preferred you could use feta.

All of my non-quinoa people enjoyed this salad.  Guess what's for lunch this week?!

Monday, 11 January 2016

Recipe: Warm Summer Spaghetti


We have been enjoying a warm summer spaghetti meal over the last two weeks.  Really, because Mum gave me a basil pot plant for Christmas.  She told me, right off the bat, she didn't believe I would plant it or keep it alive for any lengthy period of time; just that I would use it and enjoy.  Oh the relief of not having to keep something alive.  She knows this is not one of my skill sets.

The pot has been sitting on my bench and I've been watering it when the soil feels a tad dry.  The first thing I thought of was tomatoes and bocconcini, because that always goes perfectly with basil.  This is the result.  All those things mixed with pasta, spring onion and garlic.  Yum!

Warm Summer Spaghetti

mini roma or cherry tomatoes, quartered
spring onions, finely chopped
bocconcini, drained & the cheese gently torn into small chunks*
fresh garlic cloves(s), finely chopped
handful of basil leaves, finely chopped right before adding to the pasta
spaghetti - enough for your family

  1. Cook the spaghetti according to package directions.
  2. While the spaghetti is cooking prepare the rest of the ingredients.
  3. Drain the spaghetti in a colander, and while it drains, return the pot to the heat and allow the water to dry out.
  4. Turn the heat to low; add some butter and once melted, add the garlic and salute gently until cooked.
  5. Turn the heat off and add a little olive oil; return the spaghetti to the pot and toss to coat with the garlic butter and oil.
  6. Add the remaining ingredients to the pot and toss gently.  Add a little oil if you think it's too dry.
  7. Serve and enjoy.
* I tear each ball into about four pieces; be gentle with them!

I haven't really given quantities here because it depends on how many people you're feeding.  For the five of us I use 2 spring onions, 2 garlic cloves and a small container of the mini romas.  I get the bocconcini from Aldi and use two small tubs (that's the only size they have).  Sorry, I have no idea of the weight.  I do know that I get to eat a couple of bocconcini balls myself (cook's privilege!!).


You're welcome!

Wednesday, 23 September 2015

Best Risotto Recipe Ever


I've been reading Shauna Niequist's "Bread and Wine" this week (not done yet!), and as I suspected I am loving the book.  This is the first book of hers that I've read, and it is dense with descriptive language in a way that just immerses me in her stories.  Those stories are real and raw and true and honest and I feel like we've become best friends.  Of course, we've never met and she doesn't know I exist, so really we're not friends at all.  But this book is about what it is to share community and food and how the two are so intertwined.  And because it's Shauna, there are recipes scattered throughout.  My experience is that Shauna's recipes are always worth trying, even though there are no pictures.  Ordinarily that would be enough to stop me from trying a recipe, but sometimes experience trumps little things like that.

Last night I tried her recipe for risotto.  I'm telling you here and now, not only is this Shauna's "go to" risotto recipe, but it will be ours, now, as well.  You will find the recipe, or rather general instructions, here.  You'll need to scroll down to the Mushroom Risotto.  Last night I roasted cubes of pumpkin sprinkled with thyme, and some mushrooms cut into chunks.  It was perfect.  Full of flavour, oozy, rich, just the right amount of salty without adding any, because of the stock powder and the parmesan cheese.

And here's my tip for those of you who fear risotto because of all the stirring:  After you've added the cup of wine and the first cup of stock dump in all the liquid at once.

I know, I know.  The Italians are shouting things at their screens right now, but it just works.  Whenever I've made risotto with all the stirring, one cup of liquid at a time, it takes forever and I'm never satisfied the rice is cooked.  I don't like it crunchy.  Sorry.  I'm a rice and pasta neanderthal.  I like them both well cooked.  So I do the first two cups of liquid how you should and then I add all the rest of the liquid at once.  And then I cover the pot to cook.  I stir the rice every now and then, and when the liquid is nearly all absorbed, but not quite, I take it off the heat, add a big knob of butter and the cheese and....YUM.  Perfect for this neanderthal.

Wednesday, 8 July 2015

Best Ever Bread and Butter Pudding


Bread and Butter Pudding anyone?  Even if you're not a fan (I have one of those in our house) you might just appreciate this one.  Made with chocolate chip brioches, from Aldi, rather than bread and butter.  No butter, no dried fruit, just the brioche all sliced up, laid in a baking dish in layers, and covered with a custard of:

3 eggs
1/2 cup sugar
1 teaspoon vanilla
1 1/2 cups milk
cinnamon to taste (about half a tsp)

Whisk the first three ingredients together and then whisk in the milk and cinnamon.  Pour half over the brioche and sit for 10 minutes.  Then pour in the rest and bake for 50 minutes in a water bath in an oven set on 150C.

So, so, so yum.  Not too unhealthy as far as desserts go.  Every time one of the kids comes to Aldi with me we seem to come home with a packet of these little brioche buns along with the promise of dessert.


Saturday, 13 June 2015

Saturday Night - Pizza Night


We have reached new heights in homemade pizza making.  Or maybe real pizza dough and homemade sauce is just always going to be so much better than pita bread pizzas?

I used this pizza dough recipe (scroll down to the 'favourite' recipe), with semolina in it.  And I used Jen Hatmaker's House Sauce recipe for the tomato base.  And then I obediently followed Jen's instructions and froze half the dough and half the sauce.  Voila.  Pizza for another night, because I do not hate myself.

Actually, tonight saw quite a number of 'new' adventures in pizza-making here.  Jen suggested using basil pesto under the tomato sauce.  She was right.  Absolute winner (unless you have a child allergic to nuts, and then you need to do one without the pesto).  Usually I do a bacon and pineapple pizza and a potato, garlic and onion pizza.  Don't ask - it's Miss Mischief's Year 2 teacher's fault.  In any case Miss Mischief wasn't in for dinner and Miss Sunshine was at work so we got pesto and not-potato pizza!  I also didn't have any tinned pineapple.  But I did have red capsicum, mushrooms and zucchini.  I grilled and peeled the capsicum, sliced the mushrooms and used my mandolin slicer to do the zucchini in ribbons.  That was it.  Three veggie pizza with pesto and tomato sauce on the base, and mozzarella cheese.

Soooo good.

And dough and tomato sauce for another night.  I am a winner tonight folks!

Sunday, 31 May 2015

Recipe: Sar Hor Fun


Tonight's dinner was a little trip down memory lane for Dh and I.  When we were going out we used to eat at a local little Asian restaurant fairly often.  It was nothing to write home about, and a peek into the kitchen would have been a tad off-putting for the germ-o-phobes amongst us (I am not one - six years in a third world country cures one of these things if ever they had an issue).  The food, however, was delicious, cheap and plentiful.  It was a mix of Chinese and Malaysian and the owner of the restaurant knew what we loved and could pretty much order for us.  Really, ordering our meal was more about confirming that nothing had changed than actually placing an order.  Dh always ordered Char Kway Teow.  He still does when it is available.  I can't remember what I would order.

One of the dishes served at that restaurant, and one I adored was Sar Hor Fun.  It is a fried flat rice noodle dish with a mixture of meat and seafood with a soupy kind of sauce over the whole thing.  It was completely delicious and tasty and not spicy.  A perfect counterbalance to the Char Kway Teow, which is quite spicy.

Armed with fresh rice noodles and a package of pork balls from our trip to the Asian grocery last Monday this meal popped into my head this afternoon.  Thanks to the internet recipes for such things are not too difficult to find and I chose my recipe based on the pictures that went with it.  This one looked exactly as I recalled it should look and so with a quick trip to Safeway to pick up the three things I needed I set about recreating a meal of my memories.

It was perfect.  I sat there, eating my dinner, saying "Oh, this is perfect - as good as any I've ever had in a restaurant".  I kid you not, it was that good!  How often do you try to make some recipe that you've had in a Chinese restaurant and been disappointed that you can't make it taste the same?  I know, right? Well, this recipe was everything I desired and remembered.  So good!  Dh agreed it was really good.  Our kids wondered what was going on....what is this slop?  what are you making us eat?  what is this odd thing in here?  I don't think they'd ever had pork balls.

This recipe was very simple and not too time consuming at all.  A few little tips that might help you out:

  • I soaked the rice noodles in boiling water for about five minutes, drained them and then separated them afterwards.  Because much of the oil had been washed away I added a little back when I mixed them with the soy sauces.
  • My packet of rice noodles was 1kg instead of 300g.  I used the whole pack and tripled everything else except the stock...that was 500ml plus a large splash of water from the kettle.  It was perfect for our family of five adult eaters, with a little leftover for someone's lunch tomorrow.
  • I fried the noodles then removed them from the pan.  Then I did the garlic, prawns and pork balls.  I added the stock and sauce to this, thickened with cornflour and then added three whole eggs as per the instructions.  Then I added the noodles back in.  It looks sloppy and messy.  Don't be put off!
  • I wasn't able to get squid, so I had 300g of green prawns and the pack of pork balls that I had sliced.  I think something seafood and something either pork or chicken will work.  This part of the recipe doesn't have to be prescriptive.
  • I splurged on good quality organic chicken stock.  It was worth it, unless you happen to have some on hand.
Go here for the recipe.  Go on...you'll love it!

Friday, 11 July 2014

A Delicious Pumpkin, Tomato, Bean & Quinoa Salad

Roast Pumpkin, Tomato & Green Bean Quinoa Salad

This week, between cleaning the laundry and cleaning out/organising my wardrobe, I've been tootling about the internet looking for delicious, satisfying meal ideas for Fast Days.  Organising myself for 5:2 dieting is so much easier when nothing much else is going on!  I have three serves of roasted tomato and red capsicum soup in the freezer ready for going back to work, and I suspect my newest quinoa recipe is going to feature often as well.  Or some variation of it.

If you are a lover of quinoa salads you are simply going to adore this one I found at Create Bake Make.  You will find the recipe for Lauren's Roasted Pumpkin, Tomato and Green Bean Salad here. For once I made the recipe exactly as it is written, and I am in love.  The recipe says this will feed two, and probably if I were sharing it with my hubby that would be true.  But I'll get three serves for lunch without any problem.  Quinoa is surprisingly filling, yet it doesn't leave you feeling heavy.  I love it.

Tuesday, 8 July 2014

Recipe: The Best Roast Chook Ever


Have you ever had what you thought was going to be just an ordinary, everyday, run-of-the-mill roast and discovered something absolutely incredible?  Well, that happened to me last night.

I do a roast chook often.  Maybe once a fortnight, minimum.  Often weekly.  It's easy and I can do the ten million other things I need to get done while it's doing it's thing in the oven.  I then use the leftover meat in a casserole a few nights later so it's super frugal and my family thinks I'm amazing for as long as they're eating.  They love the casserole as much as the roast.  In our house the love equation seems to go like this:  Mum cooking + favourite meal = love.  I think they love me at other times too, but I know it at dinner time.

Yesterday I made a huge booboo.  I found a whole Marcro brand (organic) chook on sale.  Same size bird for $1 cheaper than the store brand so I bought it.  I got it home and discovered flavoured butter under the skin and almond and something stuffing in the cavity.  Miss Sunshine is allergic to nuts so I scooped out the goopy stuffing (best move ever, despite the allergy thing) and had my own way with it.

Maggie Beer's Barossa Chook with Preserved Lemon and Tarragon Butter seemed like a good place to start.  I didn't have preserved lemon or tarragon, but I did have lemons...and other stuff.  So I mixed my other stuff with a lot less butter than Maggie's recipe and smooshed that under the skin.  I cannot tell you how amazingly, darned good that roast was.  I don't know if it was the macro, organic bird or whether it was the butter, or a combination of both but it was sooooo good.  And interestingly the amount of liquid that came out of the chook while it was cooking was significantly less.

Tracy's Lemon, Thyme and 
Garlic Roast Chook

50g butter
zest of 1 lemon
1 1/2 teaspoons dried thyme 
1 large clove garlic, peeled & finely chopped
1 whole chook (1.8-2kg)
the rest of the lemon
  1. Preheat the oven to 180C (160C fan forced)
  2. Mix together the butter, lemon zest, thyme and garlic.
  3. Separate the skin from the meat on the breast side of the chicken, gently so as not to puncture the skin.  It will be attached down the center bone so carefully use a super sharp knife or scissors to separate that membrane.
  4. Smoosh the seasoned butter under the skin across the whole breast of the bird.
  5. Cut the lemon into 3 pieces and stuff it into the cavity of the chook.
  6. Place the chook in a baking dish and spray the skin with olive oil; place in the oven.
  7. Bake for about one and a half hours or until you're confident it's cooked through.
  8. Rest in a warm place for about 10 minutes before carving.
My family absolutely fall about themselves over roasted carrots.  So I cut 5 fairly large carrots in half and then quartered the large end and halved or quartered the thinner end, depending on the size.  I tossed them in the empty carrot bag with some oil and baked those in the pan with the chicken.  They came out perfectly.  Carrots take a surprisingly long time to roast!

You know what?  For the first time in forever no one asked for gravy.  Although the pan juices from this chook would have made the most delicious gravy as well!


Wednesday, 25 June 2014

Recipe: Lemon Delicious Slice


When you have a lemon tree absolutely laden with golden treasure it inspires a search for new recipes.  I have a real winner to share with you today.

Lemon Delicious Slice

Ingredients:
Base
150g unsalted butter, chopped
1/2 teaspoon vanilla extract
1/3 cup caster sugar
1 tablespoon cornflour
1 1/3 cups plain flour 

Topping
4 eggs
1 teaspoon finely grated lemon rind
1/3 cup plain flour
1 1/3 cups caster sugar
2/3 cup lemon juice

Method:

  1. Preheat oven to 180°C/160°C fan-forced. Grease a 3cm-deep, 16cm x 26cm slice pan. Line with baking paper, allowing a 2cm overhang on all sides.
  2. Place butter in a large microwave-safe bowl. Microwave on MEDIUM (50%) for 1 minute or until melted. Set aside to cool. Stir in vanilla and sugar. Sift flours over butter mixture. Using a wooden spoon, stir until a soft dough forms. Transfer to prepared pan. Press into pan. Bake for 15 to 20 minutes or until golden. Remove from oven. Set aside to cool.
  3. Make topping Whisk eggs, lemon rind, flour and sugar together until smooth. Add lemon juice. Whisk to combine. Pour over base. Bake for 15 minutes or until just set. Cool completely in pan. Dust with icing sugar. Cut into pieces. Serve.
  
Every time I make this it disappears as though in a vacuum...you can't blink or you'll miss out!  

Enjoy!

Sunday, 4 May 2014

The Perfect Scone: Success At Last!


Do you have a particular cooking goal to succeed at a basic recipe which you have yet to achieve success with?  It's funny, when you talk with people who have been cooking for a long while you will find some struggle with pastry.  Some are baffled by pavlova.  Some think bread-making is only for the brave or the foolish.

My kitchen nemesis has been the humble scone.  Sad but true.

I consider myself a competent cook.  All the things I've listed above have never given me an ounce of frustration or trouble, but scones have been another story.  I've tried all kinds of recipes: the traditional rub-the-butter-in, lemonade scones, cream scones, using the food processor to do the rubbing in.  Really, I've tried them all.  My scones are kind of just OK when they're hot but they're absolute rocks when cold.  Demoralised, I had declared defeat and decided this was just something best left to others.  Pretty much the way my mother leaves the pavlova making to me (although she is certain the oven has a part to play).

The other day a friend at work had a scone for morning tea and it was still light and fluffy the day after she'd made it.  After a long round-table (literally...our staffroom tables are round) conversation about methods I thought perhaps one last attempt should be made.  As with all these things one heads to Google to see what 'fool-proof' recipe can be found.  And I may well have found the very thing for this scone-challenged cook.


A few years ago the Sydney Morning Herald ran an article about the best scone recipe and thanks to the wonders of the internet the article was easily available today.  It seems I'm not alone with this particular scone-making struggle.  The Country Women's Association in Australia is renowned for magnificent scones and this author tested a number of recipes (including ones I had tried).  She finally offered up a recipe I had not seen before so I gave it a go this afternoon.  You know what?  I think I found the recipe for me.  Rather than lemonade or cream or butter this recipe had an egg and oil in it.

They turned out beautifully.  I'll let you know tomorrow if they are still OK when cold.  But I'm fairly certain they will be.  The recipe and article can be found here.  I promise you the article is worth the read and the recipe lived up to it's touted 'perfect scone' label, and is worth storing however you store collected recipes (I use OneNote).


Recipe:  The Perfect Scone
 (Gloria Hyatt's recipe)

1 egg
4 tablespoons oil (Gloria uses vegetable oil)
2 cups milk
4 cups self-raising flour
1 teaspoons salt
1 tablespoon sugar
  1. Beat the egg, oil and milk until combined. 
  2. Sift the flour, sugar and salt into a bowl. 
  3. Add the egg mixture to the flour. 
  4. Knead until just combined and then turn the dough out onto a floured surface. Pat into a flat shape of the thickness you'd like your scones. Hyatt prefers ¾ inch. 
  5. Cut with a floured scone cutter and then place on a greased tray. 
  6. Cook at 220 degrees for 12 to 15 minutes.
Tracy's Note:  You will need to flour the bench very well and then flour the top of the dough well too, then it's not too sticky to handle.  I didn't actually do much more than turn it over two or three times and then pat it into shape for cutting the scones.

What's your kitchen nemesis?

Tuesday, 8 April 2014

Recipe: Roasted Tomato and Red Capsicum Soup

This soup began as a bag of tomatoes and red capsicums that were beyond their salable best.  I snapped up the $2 bag last week whilst grocery shopping, and they have been skulking about in my fridge ever since.

Well...Sunday night happens to be soup night quite often so armed with a recipe from Julie Goodwin's Our Family Table I decided to deal with these less-than-impressive vegies.  As it turns out Julie's recipe was not what ended up in our bowls, apart from the fact that my tomatoes were indeed roasted! 

Roasted Tomato and Red Capsicum Soup

Ingredients:
1kg tomatoes, quartered
4 red capsicums, seed and stem discarded
1 red onion, peeled and diced
2 cloves garlic, peeled and crushed
2 tablespoons tomato paste
a slurp of red wine
800g tin diced tomatoes
2 cups chicken stock (water and stock powder is fine)

Method:
  1. Preheat the oven to 180C.  Place the tomatoes, cut side up, on a lined baking tray.  Spray with olive oil and sprinkle with salt.  Bake for 45 minutes.
  2. Preheat the griller and lay the capsicums skin side up on the tray.  Grill until the skins are completely blackened.  Remove from griller and cover so the skins sweat and are easier to remove.  When cool, remove skins.
  3. Saute the onion and garlic in a large soup pot until softened; add the tomato paste and cook for a minute or two while stirring.
  4. Add the wine (maybe about 1/4 cup?) and stir to release the tomato paste from the bottom of the pan.
  5. Place the roasted tomatoes, capsicums, tinned tomatoes and chicken stock in the pot.
  6. Using a stab blender, blend the soup until it is completely smooth.  
  7. Add salt and pepper to taste.
  8. Serve with a nice crusty bread.
A loaf of red capsicum ciabata bread went very well indeed with this soup.  We even had leftovers soup, which I've just had for lunch today.  Ooohhhh so good.  Rich, robust, smooth.

This was the perfect lunch to counter my most-incredibly-frustrating-morning-ever, which included tears, tantrums and a great deal of growling.  Loudly.  The kids wisely avoided me and stayed at the other end of the house.  Those people are smart when they need to be.  However, as a kindred spirit with Jen I overcame the technology and I won "like a boss".  Yeah, maybe not so much bossing, but more whimpering and relief as I fell across the line when the goal was reached.  Don't ever tell me I have to set up an online learning module using my University's platform to do so.  I don't even know how those people live a sane life.

But the soup - not so hard.  You can do that "like a boss" without even blinking an eye.

Monday, 30 December 2013

Recipe: Ice-Cream Winner


Unfortunately the photo above is all that is left of last night's chocolate ice-cream.  I've mentioned this recipe before and it has become a very firm favourite in our household.  The recipe comes from Nigellissima, and of course I've tweaked it a little.  Firstly because I don't keep the liqueur she uses and secondly because our sweetened condensed milk comes in tins that are double the weight stipulated in the recipe.  The original recipe for 'no churn coffee ice-cream can be found here.  I've tried a couple of different variations to the basic idea of this recipe - they are below for your summer enjoyment.

Chocolate Ice-Cream

1x 395g tin sweetened condensed milk
1x 600ml container thickened cream
2 tablespoons cocoa powder (or more if you want it stronger)

Place all ingredients into a mixing bowl and whip until the consistency of whipped cream.  
Pour into an airtight container and freeze for at least six hours.
I find my freezer makes this pretty hard so we put it in the fridge about half an hour before I want to serve it and it scoops out perfectly.

Caramel Ice-Cream

1x 395g tin 'top 'n fill' sweetened condensed milk
1x 600ml container thickened cream

Method as above.

~oo0oo~

This recipe is incredibly easy and quick to make.  I did this first thing Sunday morning for guests that evening whilst sipping my morning cup of tea, given the mixer truly does all the work it was absolutely no burden and took no more than five minutes.  I think you'll find it difficult to go back to commercial ice-cream after trying this.  I'm wondering how it would go with lemon zest and a little lemon juice rather than the cocoa.  When my lemons start to ripen I'll let you know!

Saturday, 23 November 2013

Mocha Muffins


If you've been reading here for a little while you will know I find nothing more inspiring for getting me into the kitchen than a little bit of Nigella viewing on TV.  The ABC have been airing her 'Nigellissima' series again, which is on when we normally watch the news.  I am making use of technology and watching episodes at my leisure using my iView app.

The kids have been complaining that they have snacked too heavily over the weekend - a charge led by their father.  In any case by Tuesday everything I had bought had been consumed with the ferocity of a swarm of locusts.  So after some Nigella viewing I went and made some mocha muffins.  When we were in Costco the other day I found some Kirkland Signature semi-sweet chocolate chips and I just wanted to use some.  I also managed to get 2kg of unsalted butter for just $2 - it was close to use-by!  My recipe is a trusted, tested one from Steph's Country Kitchen Goodness.

And on that note I've been noticing some changes in my baking powder.  My closest friends know I have baking powder issues.  Any time someone heads to the US and asks me if I want anything my immediate response is Rumford's Baking Powder.  Last time my friend Rel was the one travelling and she brought me back some Clabber Girl Baking Powder.  Either way they're both double acting - something that seems to have escaped the baking powder manufacturers in this fair land and it just works soooooo much better!  Ever since our trip to the US I have pined for baking powder that actually works.  Last week I had to buy some more baking powder for 'general use' (the American stuff is saved for special things - I make it go as far as I can!) and the branding had changed on the container.  I used it in these muffins and it seemed to me that perhaps we now have double acting baking powder ourselves.  I think I'll need to do some more experimenting.

Monday, 26 August 2013

Everything old is new again: Meatloaf


It's Mr Busy's fault doing.  He requested meatloaf a couple of weeks ago and now we're all a bit hooked.  It's on the menu plan at least twice a month.  Old fashioned?  Yes!  Delicious?  You bet!

A way, way back in 2010 I posted this recipe for Savoury Glazed Meatloaf.  It came from a friend's Mum - one of those old-fashioned country women whose kitchen turns out all manner of really good honest food.  It's the recipe I still use now and I always add the grated carrot, which I saute with the onion.

Miss Mischief was having a go at making the recipe the other day and I couldn't be bothered with the finickity baking instructions, so I had her put it in a silicon form loaf pan and leave it to bake right side up.  You know what?  It was about the best meatloaf I've ever had.  The silicon form must have made quite the difference.  Or maybe it was just that I didn't make it?  We still baked it for half the time before adding the sauce stuff on top and now the silicon form is our cooking method of choice.

Tuesday, 9 April 2013

A New Recipe: Roasted Vegetable Lasanga


I tried a new recipe over Easter.  Apparently I break what is a culinary cardinal rule.  You should never experiment on guests.  It seems like I've made a career of doing exactly that.  Because when I have guests I'm usually looking for something a little bit different and interesting rather than plain, old, whatever-we-normally-have.  Not that guests would know the difference I suppose.  My parents think our 'normal' is like being in a restaurant.  I beg to differ, but I imagine that's all a matter of perspective.

Anyway, I wanted a roasted vegetable lasagne recipe and I found a really good one here.  Our only problem with the recipe was the use of tomato pesto.  I ended up making my own pesto last night so that I could use pine nuts instead of cashews, as Miss Sunshine has a nut allergy but is fine with the pine nuts.  I got that recipe from here.

I have some vegies leftover for someone's lunch and whole night's worth of lasagna in my freezer for another day.  I think after a trip to Costco to refill my freezer I'll be ready to get into another school term.  Almost.

Thursday, 10 January 2013

Exciting Discovery for Recipe Organisation - MS OneNote!

Do you have a whole ton of recipes floating about your house here and there?  I sure do.  Twenty-two years of marriage in which you are the chef will do that to a person.  If you're anything like me keeping all those recipes in such a way that they're easily accessible is quite a challenge.  I have clipped magazine recipes in display folders.  I have a desktop file-tray draw dedicated to things I print from online sources.  I have a little A5 binder where I keep recipes I've typed over the years.  And of course there's all the beautiful recipes books I've collected.  Surprisingly I know exactly where to put my hands on whatever it is I need, yet that does not reduce the number of folders and piles and collections I seem to have.  I haven't even mentioned the pile of magazines gathering dust in a basket!

The other day I wondered if there was some kind of template I could use to start recording all our favourite recipes on the computer.  Did you know that there is a whole program that has a recipe template already in it all set up and ready to go?  Neither did I.  The answer is Microsoft OneNote.  I happen to already have this on my computer.  It came with the Academic suite of Microsoft programs I bought 18 months ago - you may well have it and not know about it either.

The template is super easy to use.  You just click on the tab, click on the spot to add a new page and off you go.  You can add tabs, you can rearrange the recipes in alphabetical order (a special treat for obsessive people like me) and there are already a handful of recipes in there!


So, here is something I want to do throughout the year:  add my family recipes to my OneNote Recipe Book.  What I especially wanted to be able to do was to add a short narrative about the recipe and what makes it special to us, or where it came from...like my Granny's pavlova recipe or Dh's favourite dip and the way it has evolved to what I make today.  Those stories tell something about us as a family and it is a heritage I want to be able to pass on to my children.

How do you store your recipe collection?

Images from: blogs.office.com